-
High Light
RS485 Static Electricity Eliminator
,DC 24V Static Electricity Eliminator
,8 Emitters Static Electricity Eliminator
-
Model NoAP-DJ1802
-
Input VoltageDC 24V (dual RJ45 Interface)
-
Input Current<0.6A
-
Output VoltageDC±5KV→±5.5KV
-
Power<14.5W
-
Ion EmissionDC
-
Ozone Thickness≤0.05ppm(150mm From Air Outlet)
-
Ion Balance≤|±10V|
-
Discharge Speed≤1.5S(300mm From Air Outlet)
-
Communication MethodRS485
-
Installation Accessories1 Pair Of U-shaped Aluminum Powder Spraying Mounting Bracket, 2 Pairs Of Stainless Steel Screw Handles (M5 × 8)
-
TypeSingle Head Desktop Ionzation Device
-
Product NameStatic Electricity Eliminating Dust Anti Static Ionizer Air Blower
-
FeatureEliminates The Static Electricity Of Film And Paper Surface
-
Place of OriginChina
-
Brand NameAP&T
-
CertificationCE
-
Model NumberAP-DJ1802
-
Minimum Order Quantity1 piece
-
Packaging DetailsIn cartons
-
Delivery Time5 working days
-
Payment TermsT/T, Western Union, MoneyGram
-
Supply Ability1000 pieces per month
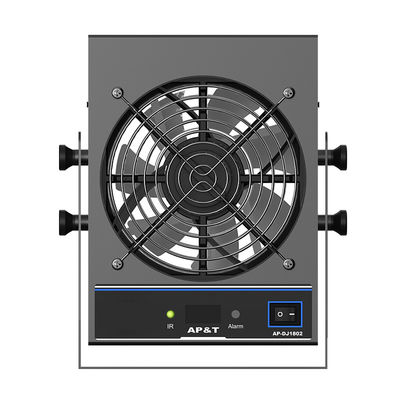
8 Emitters DC 24V RS485 Static Electricity Eliminator


High Voltage AP-DJ1802 PULSE DC Static Electricity Eliminator Ionizing Air Blower
◆ Features
1. 8 emitters makes high ion volume and fast decay time;
2. Auto-cleaning when switch on;
3. Default auto-cleaning time every 8 hours, Artificial emitter cleaning maintenance free;
4. Five gears of stable fan speed;
5. LED display shows ID address , fan speed and cleaning time;
6. Duty ratio of positive and negative ion output adjustable to adjust ion balance;
7. Auto balance with range ±10V.
9. Light & Voice alarm when fan default and ion balance abnormal;
10. 10. Remote control ion output When Plate or material surface with high positive static charge, Press “Fan+”“IB-”; When Plate or material surface with high Negative static charge, Press “Fan-”“IB+”
11. Support integrate control by PC, monitor working state of ion blower
12.CE certificated, with electromagnetic protection which will not cause electromagnetic interface to other equipment; It can also effectively avoid external electromagnetic interference and affect the normal operation of the fan.
◆ Industry Application
Electronics, Plastic ,Chemical ,Printing, Optics Industry
◆ Specification
| Model No | AP-DJ1802 |
| Input voltage | DC 24V (dual RJ45 interface) |
| Input current | <0.6A |
| Output voltage | DC±5KV→±5.5KV |
| Power | <14.5W |
| Ion emission | DC |
| Emitter electrode | Tungsten |
| Discharge range | 750*300mm(L*W) |
| Air volume | <179CFM |
| Noise | <75dBA(150mm from air outlet) |
| Ozone thickness | ≤0.05ppm(150mm from air outlet) |
| Ion balance | ≤|±10V| |
| Discharge speed | ≤1.5S(300mm from air outlet) |
| Alarm indication |
Boot instant-blue light Normal working -Green light(Under monitoring) Fan alarm -Red light flash with beeping Ionization abnormal-Red light slow flash with beeping Blue light blinks when infrared debugging |
| Working temperature | 0℃-50℃ |
| Working humidity | <70%RH |
| Dimension | 177*81*205.5mm(L*W*H) |
| Power adaptor |
1. Interface power supply (default configuration): INPUT: AC100—240V 50 / 60Hz; OUTPUT: DC24V 2A (dual RJ45 interface) 2. Jack-type power supply (customized): INPUT: AC100—240V 50 / 60Hz; OUTPUT: DC24V 2A (5.5 * 2.5 single male head) |
|
Integrated power supply (Optional) |
INPUT:AC100—250V 50/60Hz OUTPUT: DC24V 2A (16 RJ45 interfaces) |
| Communication method | RS485 |
| Shell material | Aluminum dusting |
| Installation accessories | 1 pair of U-shaped aluminum powder spraying mounting bracket, 2 pairs of stainless steel screw handles (M5 × 8) |
| Weight | Bare metal (including bracket) 1125g |
| Net weight (network cable, power cord, adapter, remote control) 1590g | |
| Gross weight 2080g | |
| Quality assurance | 1Year |
| Certificate | CE |
![]()
Testing standard:ANSI/ESD.STM3.1,ANSI/ESD.SP3.3,SJ/T 11446—2013
Testing instrument:Trek157 Static tester
Testing voltage:±1000V → ±100VAttenuation
Testing environment :Humidity50±5%;Tempertaure:23±3℃
![]()
- Trouble shooting :
| NO | Problems | Possible cause | Solution |
| 1 | Power supply connector lamp on left bottom not lighting | Unconnected power cable | Check the connection of power cable |
| Power supply not suitable | Check the power supply MODEL INPUT:100—240VAC 50/60Hz;OUTPUT:24VDC 2000mA | ||
| 2 | The static elimination performance is significantly reduced | Electrode dirty or damaged | Clean or replace electrodes |
| The ionizer install position is incorrect | Check the best installation position | ||
| 3 | Discharge ability low down | There are conductor or other ionizer nearby | Remove conductor or other ionizer |
| 4 |
High voltage alarming (The panel indicator lights red) |
Electromagnetic interference | Turn off the power switch / unplug the power cable and restart the ionizer |
| Abnormal discharge | Check whether the electrode is contact with metal conductor | ||
| High voltage module without power supply | Return back to factory to repair | ||
| High voltage module damage | Return back to factory to repair | ||
| Clean the brush to cover the electrode needle | Use the remote control to manually brush the needle, or shut down and restart to make the cleaning brush leave the electrode needle | ||
| 5 |
Fan alarm occurred (The panel indicator is steady red) |
Fan failure | Return back to factory to repair |
| Damaged fan power supply line | Return back to factory to repair | ||
| 6 | Unable to discharge | High voltage module damage | Return back to factory to repair |
| Motherboard chip damage | Return back to factory to repair | ||
| Poor grounding / no grounding caused by chip damage | Check the ion blower and plant equipment grounding, and Depot Repair | ||
| 7 | The product smokes or burns | High voltage module damage or discharge bracket insulation damage | Return back to factory to repair |
◆ Notice on use and safety warning
- Read this manual carefully before installing and using of the device.
- Be sure the device reliable ground connected during use, otherwise may cause bar body burn..
- Do not use this device in the environment where the humidity is greater than 75%.
- Do not use this equipment in a flammable or explosive environment.
- It is strictly forbidden to disassemble device without authorization. Internal maintenance and repair must be carried out by professionals.
- Touch water is strictly forbidden, Otherwise will be electric shocked or fire.
- Check or replace the product, you must turn off the power, otherwise it may cause electric shock or fire
- The product is designed for static elimination. It is strictly forbidden to use for other purposes. Any abnormal use may cause machine malfunction, electric shock, fire and other hidden dangers.,
- Do not touch the electrode needle when the power is on, otherwise it may cause malfunction and electric shock.
- The emitter is a sharp metal object, please use it with care.
- Before powering on the product, please check the specifications of the power supply. Any power supply that does not meet the specifications will cause damage or even failure
- Please check the product power cord/communication line regularly. If it is damaged, please replace it immediately, otherwise it will cause problems such as leakage, poor communication and abnormal operation.
◆ Installation guide
- Installation:
Choose optimal location for discharge and fix the bar and power supply steadily..
Insert the adapter power cord into the ion fan power socket, and insert the 3pins power socket into the socket
Turn on the switch. The ion fan will automatically brush the needle. When the indicator light is green, the fan is normal working.
Our products are sold all over the world, you can rest assured.